

Table of Contents
- Custom Stencil Art Commission Process Explained: How a Brief Becomes a Stencil
- Start With a Clear Reference Photo and a Strong Design Brief
- Use an Art Commission Brief Template to Lock In Design Details
- What to Expect From a Custom Stencil Portrait Commission
- The Artwork Revision and Approval Process, Step by Step
- Custom Artwork Turnaround Time and What Can Delay It
- How a Hand-Cut Stencil Becomes a Finished Artwork
- Frequently Asked Questions
Last Updated: October 6, 2026
Custom Stencil Art Commission Process Explained: How a Brief Becomes a Stencil
A custom stencil art commission is a made-to-order artwork where you brief an artist, they design and hand-cut a stencil, then paint it onto your chosen surface.
Commissioning custom stencil art is simpler than most people expect. You send a photo and a short brief. You approve each stage before the artist moves on.
Below, we break down every step: the reference photo, the brief template, sizing, surfaces, revisions and turnaround. Most people ask two things first: how long it takes and what it costs.
Start With a Clear Reference Photo and a Strong Design Brief
Good stencil work starts with a good photo. A sharp, well-lit image gives the artist clean shapes to work with. A blurry or dark one forces guesswork, and guesswork shows up in the final piece.
What Makes a Reference Photo Work for Stencil Art
Stencil art relies on contrast. The artist reduces your image to a few flat layers of colour, so the subject needs to stand apart from the background.
- High resolution. Send the largest file you have, not a screenshot.
- Even lighting. Avoid harsh shadows across the face or subject.
- Clear subject. One person or object reads better than a busy crowd.
- Simple background. Plain walls or skies cut cleanly into a stencil.
- Straight-on angle. Side angles distort features when cut.
If you only have an old or low-quality photo, say so early. We can often work with it, but we will tell you what will and will not survive the stencil process.
Use an Art Commission Brief Template to Lock In Design Details
An art commission brief template is a short written summary of what you want. It stops the back-and-forth that delays most projects. Fill in the blanks and send it with your photo.
Here is a template to consider:
Art Commission Brief
- Subject: (who or what)
- Reference photo(s) attached: (file names)
- Style: (pop art / portrait / music icon / other)
- Colour palette: (list up to 4 colours)
- Size: (width x height in cm)
- Surface: (canvas / wall / board / other)
- Placement: (room, wall, indoor or outdoor)
- Deadline: (date, if any)
- Must-have details: (e.g. specific clothing, logo, background)
- Anything to avoid: (e.g. no text, no border)
The details that matter most are size, surface and colour. Get those wrong and the whole piece changes.
What to Expect From a Custom Stencil Portrait Commission
A custom stencil portrait commission turns a photo of a person into layered, painted artwork. The artist studies the face, reduces it to stencil layers, then builds the portrait one colour at a time.
Choosing Size, Surface and Placement Before Cutting Begins
Size, surface and placement decide how the piece is made, so we settle them before any cutting starts.
| Choice | Options | What It Affects |
|---|---|---|
| Size | Small, medium, large (in cm) | Number of stencil layers and detail |
| Surface | Canvas, board, wall | Paint type and prep work |
| Placement | Indoor, outdoor | Primer and sealing needed |
| Colour | 2-4 flat colours | Contrast and mood |
Placement matters more than people think. A wall piece needs on-site application and surface preparation. A canvas piece is painted in the studio and framed for display. Outdoor work needs primer and a protective top coat to last.
The Artwork Revision and Approval Process, Step by Step
The artwork revision and approval process often has formal checkpoints. You sign off on each before the artist continues. This keeps the final piece close to what you pictured, and it keeps the project moving.
- Design proof. We send a digital mock-up of the stencil design. You review colours, layout and detail.
- First revision round. You request changes. Most clients ask for one or two tweaks here.
- Final proof. We send the updated design for sign-off.
- Cut approval. Once the design is locked, we cut the stencil. No design changes after this point.
- Finished piece approval. We send photos of the completed artwork before delivery or installation.
Revision Limits, Deposits and Cancellation Terms
Every commission runs on a written agreement that sets out the commercial terms before any cutting starts.
Who Owns What: Usage Rights and Reproduction
Usage rights are agreed in the brief, not assumed.
According to Arts Council England guidance on commissioning artists, a clear written agreement at the start protects both client and artist. We follow that approach on every project, and we send the agreement with the quote so there are no surprises later.
Custom Artwork Turnaround Time and What Can Delay It
Custom artwork turnaround time depends on size, complexity and how fast you approve each stage. Most delays come from waiting on feedback, not from the painting itself. The table below sets out a typical stage-by-stage timeline so you can see where your project sits at any point.
| Stage | Small, simple piece | Medium portrait | Large or multi-layer piece |
|---|---|---|---|
| Brief review and quote | 1-2 working days | 1-2 working days | 2-3 working days |
| Design proof issued | 2-3 working days | 3-5 working days | 5-7 working days |
| Revision round | 1-2 working days per round | 2-3 working days per round | 3-5 working days per round |
| Cut approval and stencil cutting | 1-2 working days | 2-4 working days | 4-7 working days |
| Painting and layering | 2-4 working days | 5-8 working days | 8-15 working days |
| Sealing, drying and finishing | 1-2 working days | 2-3 working days | 3-5 working days |
| Total (with one revision round) | about 1-2 weeks | 2-4 weeks | 4-6 weeks |
On-site wall work adds time for surface preparation, masking and drying between layers. A typical indoor wall piece adds two to four working days on site. Outdoor work adds a weather window, because primer, paint and sealer all need dry conditions to cure properly.
The Milestones That Keep a Commission on Schedule
A commission moves through client-facing milestones. Each one is a point where the project waits on you, not on the studio.
If each milestone is turned around within two working days, the project stays on the quoted timeline. If a proof sits unread for a week, the whole project shifts by a week.
What Actually Causes Delays
The biggest delay is a slow approval. Other common causes are:
- Low-quality reference photos. If we have to request a better image, the brief stage stretches.
- Changes requested after cutting. This means a new stencil and a new cutting slot, which can add a week or more.
- Outdoor jobs waiting on good weather. Primer and sealer need dry, mild conditions. A wet or freezing week pushes the schedule.
- Complex layering discovered mid-design. If the proof reveals more layers than expected, we flag it before cutting so you can approve the extra time or simplify the design.
- Courier or installation scheduling. For wall work, access to the site and any building-management approvals can add days.
If you have a fixed deadline, tell us in the brief and we will confirm whether it is achievable before you pay the deposit.
How a Hand-Cut Stencil Becomes a Finished Artwork
A hand-cut stencil is made by tracing the design onto stencil film and cutting each layer by hand with a scalpel. The layers are then painted one at a time onto the surface to build the final image.
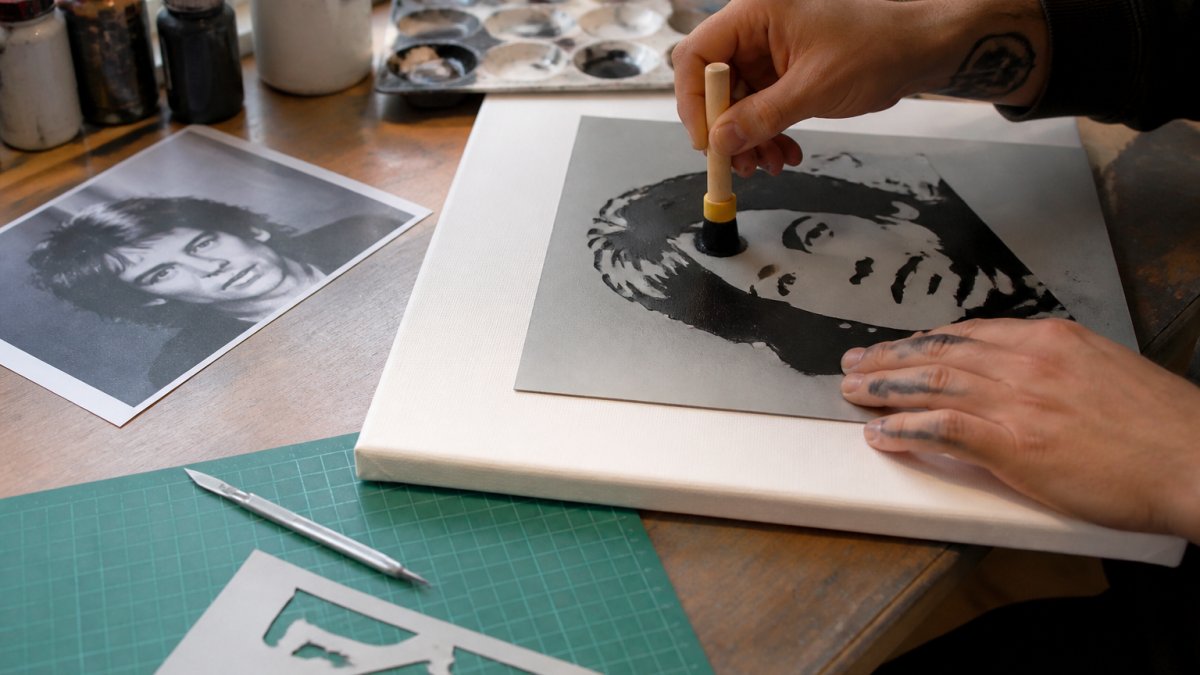
The process runs in order:
Acrylic paint dries fast, which keeps the layers sharp. For outdoor surfaces, primer and a UV-resistant sealer can help colours hold up. After installation, wipe the surface with a soft, damp cloth and keep it out of direct harsh sunlight where you can.
If you would like to see finished examples before you brief us, our Tate's guide to printmaking techniques and our own gallery pages show how layered stencil work comes together.
Frequently Asked Questions
What information should I include in a stencil art commission brief?
Include the subject (person, icon or architectural detail), a clear reference photo, the intended size, where the piece will hang, your colour preferences and any deadline. The more specific your design details, the fewer revisions you will need later.
How long does a custom stencil art commission take?
Custom artwork turnaround time depends on complexity, size and the number of stencil layers. The commission process includes design, cutting, painting and finishing, so build in extra time if you have a fixed date.
Can I request changes to a commissioned stencil artwork?
Yes, most artists build an artwork revision and approval process into the commission. Revision limits, deposits and cancellation terms vary, so ask upfront how many rounds of changes are included and whether further changes incur a fee. Get these details in writing before you pay a deposit.
What should I check before approving the final artwork?
Check the design details against your brief: composition, colour, scale and placement of the stencil. Once you approve, changes are usually limited, so review carefully.
Commissioning art should feel exciting, not risky. The challenge is finding an artist who explains the process clearly and stands behind the work. Tboy Studios offers unique one-off original pieces, limited edition print runs, and high-quality craftsmanship informed by bespoke frame-making techniques. If you want a piece that celebrates a music icon, a cultural moment or a personal memory, get started with Tboy Studios and turn your brief into a finished artwork.


